Log inRegister
OPAC: My Account - My Lists
Evergreen v.2.2Concepts
Patron can create two types of lists of library materials: Temporary lists- Temporary list items can be transferred to an existing list to be saved permanently
- Temporary lists can be used to keep track of items for hold requests, which can be placed in batch
- Temporary lists will timeout or go away once the patron logs out
- Saved lists are saved to the patron account, where they will remain until deleted by the patron
- Patrons can have as many saved lists, with as many items in each list, as they want
- Saved lists can be annotated, shared, and downloaded
Add to my list (not logged in)
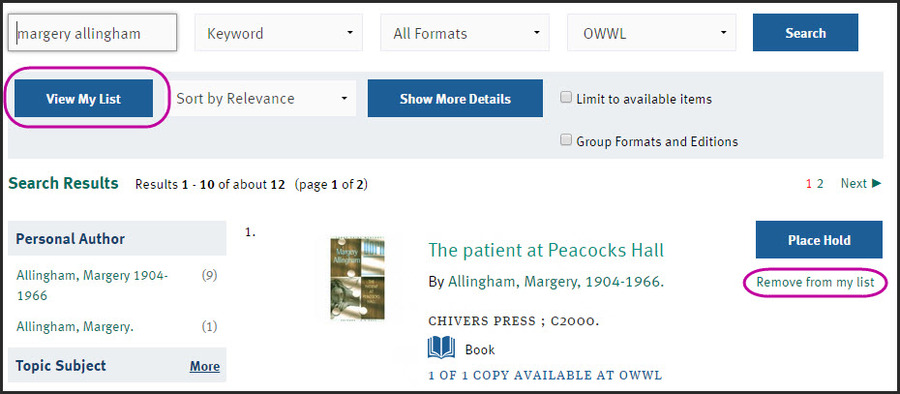
When not logged in, click "Add to my list" in the search results or title details to add the selected item to a temporary list. This will save the item while you are searching, and can later be placed on hold or added to a saved list. Once a list item has been added, the "Add to my list" option will change to "Remove from my list", and a new button labelled "View My List" will appeak. Click View My List to go to the My Lists section.
Add to my list (logged in)
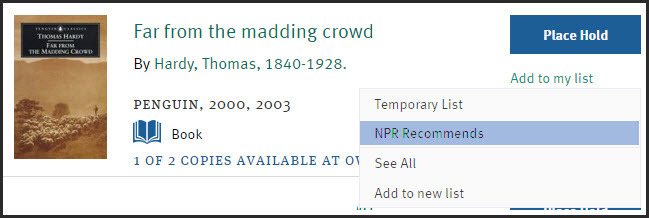
Click "Add to my list" in the search results or title details, from the drop down menu select a temporary list, existing list, or create a new list.
Add to a list when you have more than 9 or 10 lists
By default, the catalog caps the number of lists displayed to 9 in the "Add to my list" drop down next to a title, and 10 per page in the My Lists: Saved Lists list. The lists are sorted alphabetically. To add a title to a list that does not appear in the drop down:- Click Add to my list
- Click See All
- Navigate to the page with the correct list
- Click Add to this list
- Select "Temporary List" from the "Add to my list" options for every title to save
- After desired titles have been selected, click View My Lists
- The temporary list items will display above the Saved Lists
- Navigate to the page with the correct list
- Select the title from the teporary list
- Click "Actions for these items" and select the list
- Click Go
Set a default list
A list can be set as the Default List which will place the list at the top of the "add to my list" selection. All other lists are still available.- Login to your account, click My Lists
- Navigate to the list to set as default
- Click Make Default List
Place Holds from a Temporary List (not already logged in)
- For each title of interest, click Add To My List instead of Place Holds
- When done searching, click View My List to open the temporary list
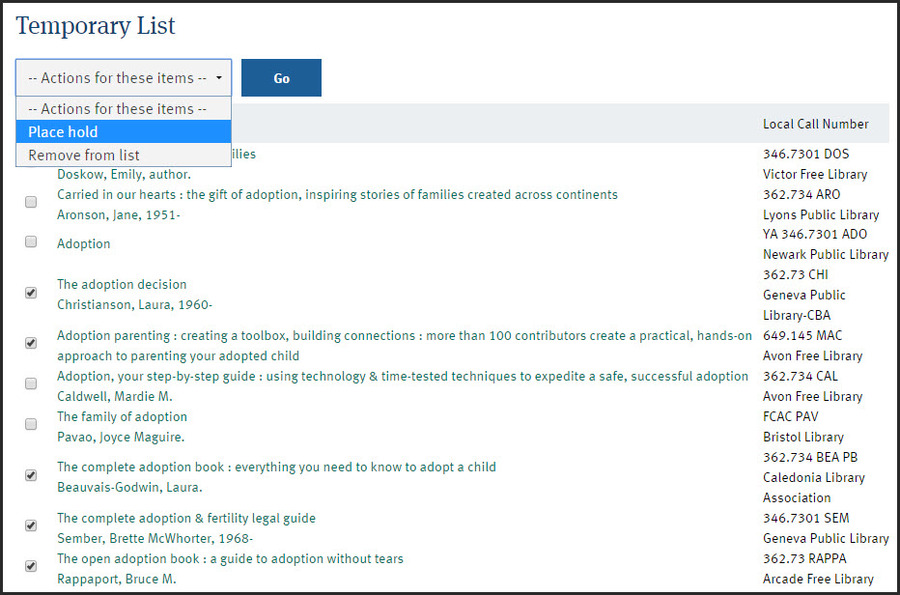
- From the Temporary list, select the title(s) to hold
- In Actions for these items, select Place Hold
- Click Go
- Log in to Your Account
- The Place Hold form displays the selected list items, adjust hold pickup location and notifications if needed
- Click Submit
- If any of the holds cannot be placed, a hold not successfully placed message will display for the item(s)
- Click Continue to go to the Account Summary, or continue searching

Move Temporary List items to an Existing List
Selecting list items and creating lists are two seperate actions. Add items are selected from search, and added to a temporary list. Temporary list items are then moved to an existing list. Patrons can login before creating the temporary list or after, but must be logged in in order to create or retrieve saved lists. These directions start from a patron not yet logged in, who is creating a new list, then moving the temporary list items.- Search the catalog
- For each title of interest, click Add To My List
- Click Login to Your Account
- Click View My List; the temporary list items will display in the Your Exisiting Lists section
- Create a new list
- From the temporary list, select the titles to move
- In Actions for these items, select the destination List
- Click Go
- The Temporary List items disappear; click on the saved list name to view your items
My Lists
Manage all lists from the My Lists section.Create New List
- Log in to your account
- Click My Lists
- In the Create New List form:
- Enter a list name
- Select sharing option
- Sharing a list means that access to the list contents can be given to other people, such as book club members, via the web or as an RSS feed. Sharing a list does not give other people access to any other part of a patron's account information.
- The sharing default is No
- Enter a description (optional)
- Click Submit
- The list appears in the Your Existing Lists area
Your existing lists
Temporary list items will appear here above other saved lists. Once lists are created, they appear in the Your Existing Lists section, in alphabetical order by list name. Click the list name to display and manage list items.List actions
These actions impact the entire list:- Share / Hide - sharing can be set when a new list is created and from the list, share/hide settings can be changed at any point.
- HTML View / RSS -
- Delete - delete the list and all contents at once
- Download CSV - download list contents into a spreadsheet. List spreadsheet:
- Includes Title, Author, material type, and Notes
- Does not include list name or description
List Item actions
Click a List name to open the list. These options impact individual list items:- Sort list items
- Re-name the list
- Add a description of the list
- Place hold on selected items - select multiple items to place all holds at once; this opens a Place Hold screen all selected items are listed
- Add Notes - click Edit in the list header to open text boxes next to each list item
Set Lists per Page and List Items per Page
Depending on how many lists have been created, they may be split into several pages. Similarly, depending on how many items have been added to a list, each lists may have several pages of items. The number of lists that display at once, and the number of items that display per page can be configured in the Account Preferences area.- While in My Account, click Account Preferences
- Click My Lists
- Click in "Lists per page" and select 10, 15, 20, 25
- Click in "List items per page" and select 10, 15, 20, 25, 50
- Click Save
 Copyright © by the contributing authors. All material on this collaboration platform is the property of the contributing authors.
 Ideas, requests, problems regarding OWWL Docs? Send feedback
