Patron Notes, Alerts, and Blocks
Notes, Alerts, and Blocks can all be applied to a patron account and managed in the Notes tab that is present in every account.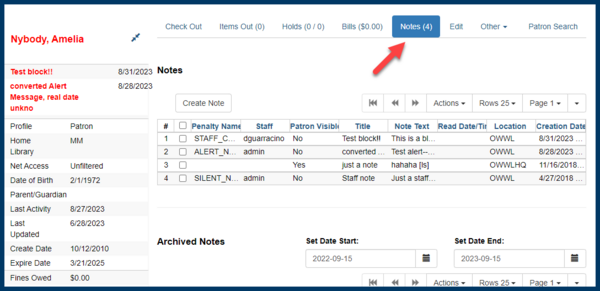
Consolidated notes interface
Managing Notes, Alerts, and Blocks
In the Notes tab of a patron account, the top portion of the screen displays active notes, alerts, and blocks while the bottom portion of the screen will display those that have been archived. The archived notes, alerts, and blocks from the last year display by default. The calendar pickers can be used to view older archived notes, alerts, or blocks. New notes, alerts, and blocks can be added by clicking the Create Note button. This process and the functionality of each type of notification are further detailed in this documentation. Library staff can Edit, Remove, and Archive notes, alerts, and blocks by selecting them from the list and then going to the Actions menu (you can also right-click on a selection to view the Actions menu).- Edit Note - allows staff to modify the original note, alert, or block
- Patron visible notes, alerts, and blocks that have been read by the patron cannot be edited by staff.
- When a note, alert, or block is edited, the note will retain the original context org unit instead of the current workstation library.
- Remove Note - will permanently delete the note, alert, or block. There will not be a record of it on the patron account once it has been removed.
- Patron visible notes, alerts, and blocks that have been read by the patron cannot be deleted by staff.
- Archive Note - will move the note, alert, or block to the Archived Notes section of the screen.
- Archiving a block will remove the block from the patron account.
- Once archived, notes, alerts, and blocks cannot be deleted from the Notes tab.
Notes
When a note is present on a patron account, staff will see a counter on the tab ribbon that indicates how many un-archived notes, alerts, and blocks are on the account that are visible at the workstation at which the staff member is logged in. To view the note, click on the Notes tab. The Notes tab contains a list of all of the notes, alerts, and blocks present on a patron’s account. The top portion of the screen displays active notes, alerts, and blocks, while the bottom portion of the screen will display those that have been archived within the past year (by default). Notes only appear in the Notes tab, whereas Alerts and Blocks can appear elsewhere. To create a new Note:- Go to the Notes tab in the patron account and click Create Note.
- A modal will appear where you can create a new Note. Required fields are highlighted in yellow.
- Select Note at the top of the screen.
- Check the box next to Patron Visible for a note that will display in the patron’s OPAC account. Leave it unchecked to create a note that is staff visible only.
- The Depth drop down menu controls the visibility of the note.
- Enter a title or subject for the note in the Title… field. The title field is required.
- Enter the main content of the note in the Note Text… field.
- Enter your initials if your library requires initials when creating notes on patron accounts.
- Click OK to create the note.
Alerts
Alerts can be applied to patron accounts to notify library staff when the patron account is retrieved. Alerts can be visible in the patron OPAC account or they can be visible only to library staff. When an alert is present on a patron account, a Stop sign and the alert text is displayed when the patron account is viewed. The alert title also displays in the patron account summary on the left hand side of the screen and there is an indicator in the patron summary that indicates how many un-archived notes, alerts, and blocks are on the account that are visible at the workstation at which the staff member is logged in. Alerts can also be displayed by going to Other → Display Alerts. To create a new Alert:- Go to the Notes tab in the patron account and click Create Note.
- A modal will appear where you can create a new Alert. Required fields are highlighted in yellow.
- Select Alert at the top of the screen.
- The Depth drop down menu controls the visibility of the note.
- Enter a title or subject for the alert in the Title… field. The Title field is required.
- Enter the main content of the alert te in the Note Text… field.
- Enter your initials if your library requires initials when creating alerts on patron accounts.
- Click OK to create the alert.
Blocks
Blocks can be manually added to a patron account to take away certain library privileges from the patron for as long as the block remains on the account. When a block is present on a patron account, a Stop sign and the block text is displayed when the patron account is viewed. The block title also displays in the patron account summary on the left hand side of the screen and there is an indicator in the patron summary that indicates how many un-archived notes, alerts, and blocks are on the account that are visible at the workstation at which the staff member is logged in. Blocks can also be displayed by going to Other → Display Alerts. To create a new Block:- Go to the Notes tab in the patron account and click Create Note.
- A modal will appear where you can create a new Block. Required fields are highlighted in yellow.
- Select Block at the top of the screen.
- The default Block is a block on CIRC, HOLD, RENEW (STAFF_CHR)
- The Depth drop down menu controls the visibility of the note.
- Enter a title or subject for the alert in the Title… field. The Title field is required.
- Enter the main content of the block in the Note… field.
- Enter your initials if your library requires initials when creating blocks on patron accounts.
- Click OK to create the block.
Ideas, requests, problems regarding OWWL Docs? Send feedback