Log inRegister
Web Client - Chrome Configuration and Settings
About
OWWL requires all libraries to use the Google Chrome web browser for the Evergreen web client. OWWL strongly recommends configuring Chrome to create a dedicated Evergreen environment to make the web client experience efficient and effective for staff. Chrome Settings and menu options change often! These directions offer a guideline for how to accomplish Evergreen-focused tasks. If the Chrome screens/pop-ups/options look different, please go to the Google Chrome Help pages at https://support.google.com/chrome/?hl=en#topic=7438008Web Client configuration
For complete configuration of the web client and related components, see: Evergreen ConfigurationEvergreen Profile
A Chrome profile for Evergreen will separate the Evergreen web client from all other Chrome browser bookmarks, browsing history, settings, etc. if you use Chrome as your daily browser. Separate Evergreen profiles can also be used to separate staff or departmental workflows - for example, a circulation profile can be set up that has different shortcuts or bookmarks than a holdings profile.- Open Chrome
- In the top right corner, click the round person/profile image
- Click Manage other people
- In the pop-up, click Add Person
- Enter a name for the profile; example: Circ Desk 1
- Select an avatar image for the profile, this will help identify the new profile
- Make sure "Create a desktop shortcut for this user" is checked
- Click Save
- The new Chrome icon will appear on the Desktop
Pin profile to taskbar
If you have multiple Chrome profiles and want them all pinned to the taskbar, follow these steps to prevent problems accessing them.- Close all open Chrome windows
- Un-pin any existing Chrome shortcuts
- Right click the icon
- Select Un-pin this program from taskbar
- On the Desktop, double click a Chrome browser profile to open it
- In the taskbar, right click on the Chrome shortcut and select Pin this program to taskbar
- Close the Chrome
- Repeat this process for other Chrome profiles
- The profile pictures indicate which shortcut opens which profile
Set Home page
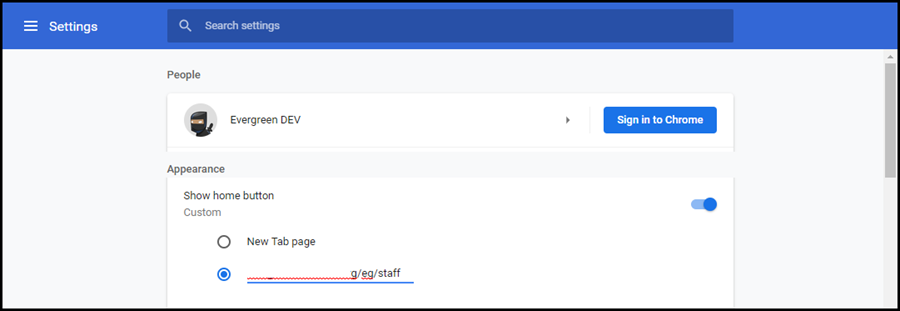
By default, the Chrome Home button is disabled. You can turn it on and, in your Evergreen profile, set the Chrome homepage to the Web Client home.- Open Chrome
- In the top right corner, click the three dots and select Settings
- Under Appearance

- Click to enable "Show home button"
- Check the specific URL button and enter the Evergreen web client address
Set start page
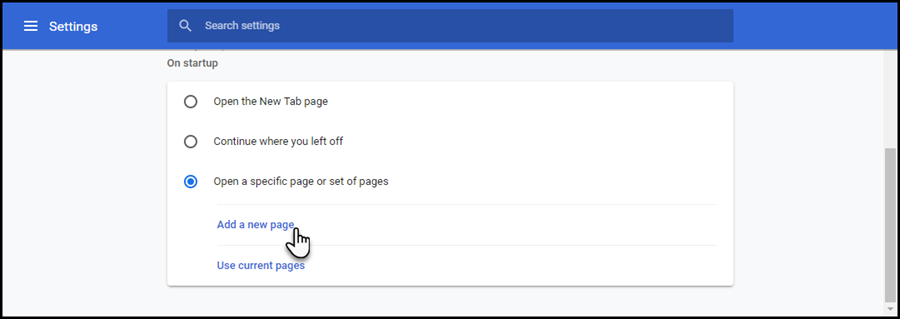
This will set the web client login as the page that displays when the Evergreen profile is launched.- Open Chrome
- In the top right corner, click the three dots and select Settings
- Under Start Up

- Click Open a specific page or set of pages
- Click Add a new page
- In the pop-up, enter the Evergreen web client address and click Add
- There is an option to add more URLS to specific web client pages, but this will not work with the Evergreen web client. Even if URLs for specific functions are added, when a new session is launched, those links will redirect to the Evergreen login/Home page.
Evergreen Bookmarks
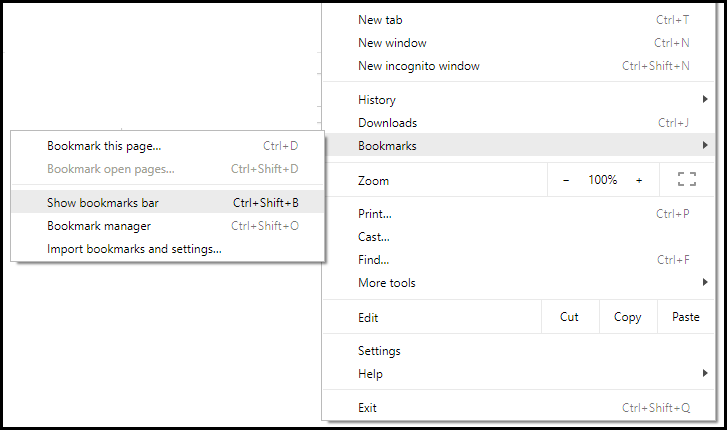
The Web Client does not have buttons to access functions, it has menus and Home page links. If you prefer to have buttons, you can use browser bookmarks to duplcate that effect. Before setting up bookmarks, login to Evergreen and register your workstation.- Open Chrome, click the three dots
- Mouse over Bookmarks
- Click Show Bookmarks bar

- Open an Evergreen function/page, such as Check Out
- Click the star in the far right end of the URL bar

- The bookmark name defaults to the page name, edit it if needed for clarity
- The bookmark folder defaults to Bookmarks bar
- Click Done, bookmarks display in the bar
Allow pop-ups for Evergreen
Several Evergreen functions use pop-ups, which, by Chrome default, are blocked from opening. You can wait until you happen upon one of those functions (Add Volume, is an example!) and turn off the blocker, or you can manually add Evergreen as a safe site.Add pop-up exception for Evergreen in advance
- Scroll down and click Advanced
- Scroll to the Privacy and Security section, then click Content Settings
- Click Pop-ups and redirects
- At Allow click Add and enter [Evergreen URL]
Allow Evergreen pop-ups when a function is blocked
When Chrome blocks a pop-up, an icon appears in the URL bar. To allow pop-ups- Click the Pop-ups blocked icon
- Select Always allow pop-ups from [URL]
- Click Done
Disable Autofill
By default, Chrome will save data entered into forms. Because Evergreen involves a lot of data entered into forms, the autofill lists can get long and cover important information below. NOTE: If you use the same browser for Evergreen as you do for other browsing, autofill will be turned off for everything. To turn off the autofill function:- Open your Evergreen Chrome browser
- Click the three dot menu in the top right corner and select Settings
- In the "Autofill" settings group
- Open "Payment methods", at "Save and fill payment methods" click the slider icon - it will turn gray, indicating it is disabled
- Click back to the main settings list
- Open "Addresses and more", at "Save and fill addresses" click the slider icon - it will turn gray, indicating it is disabled
- Click back to the main settings list
- Open "Payment methods", at "Save and fill payment methods" click the slider icon - it will turn gray, indicating it is disabled
Delete previously saved data
- Open your Evergreen Chrome
- Click the three dot menu in the top right corner and select Settings
- In the menu on the left, click Privacy and security, then Delete browsing data
- Click Advanced
- Set time range "All time"
- Select "Cached images and files" and "Autofill form data." Do not delete cookies or you will lose important Evergreen settings
- Click Clear Data
 Copyright © by the contributing authors. All material on this collaboration platform is the property of the contributing authors.
 Ideas, requests, problems regarding OWWL Docs? Send feedback
