Holds Management
Default Hold Notification Preferences
Patron Edit > User Settings
User Settings is where staff can enter information that is used to auto-fill place hold forms. For new patron records, Phone and Email are checked by default. If the User Settings are not edited on record creation, the place hold form will have Phone and Email checked. Email notifications are always a yes/no check, and use the email address on record. Staff can update this information at any time at the patron's request. Patrons can also change their own hold notification preferences from their online account.
- Default Phone Number can be any number, and does not have to be otherwise included in the patron record.
- Default Hold Pickup Location is generally the Home Library/library where the record was created. This can be changed to any library of the patron's preference.
- Hold is behind Circ Desk is a feature not used by any OWWL libraries; leave unchecked.
- Collections: Exempt is a feature not used by any OWWL libraries; leave unchecked.
- Hold Notices - check or uncheck the preferred notification format. If Phone is selected, the Default Phone Number must be included. If Email is selected, the patron's email address must be filled in. If SMS is selected, the Default SMS/Text Number must be filled in.
- Default SMS/Text Number enter the text number using the format 5855554987 (area code and no hyphens)
- Default SMS/Carrier - select the carrier from the list; if the patron's carrier is not listed contact OWWL for assistance. If the patron does not know what carrier they have, have them send a text to a library email (compose a text, and in the area where the recipient's number would go, enter the email address). The message will include carrier information.
Test Notification Preferences
- To send a test email, first make sure the patron has an email address included in the Email Address field. If you have just entered or edited an email address, you should first save the record. Then, press the Send Test Email button next to the Email Address field. The email should be sent fairly quickly.
- To send a test text message, first make the patron has both a Default SMS/Text Number added and a Default SMS Carrier selected from the dropdown. If you have just added or edited either of these fields, you should first save the record. Then, press the Send Test Text button next to the Default SMS/Text Number field. The text message should be sent fairly quickly.
Patron Holds
Open Hold Requests
This displays all currently pending holds, including suspended holds. From this list, holds can be viewed, edited, and canceled.
Recently Cancelled Holds
This list displays up to 20 holds cancelled within the previous 6 months. Canceled holds can be uncanceled, which will move it to the Open Hold Requests list. The new Request Date will be the uncancel date.
Place Hold
New Staff Catalog
Place holds interface
From Patron Account
- Retrieve the patron account
- Click Holds
- Click Place Holds
- Search for titles
- For selected title, click Place Hold
- Check to make sure the patron's hold notification preferences are correct
- Click the green Place Hold(s) button in the notifications section
- Verify that the Holds Status has changed from the blue Hold Pending to the green Hold Succeeded
- Continue to search/place more holds, or click out of the holds function
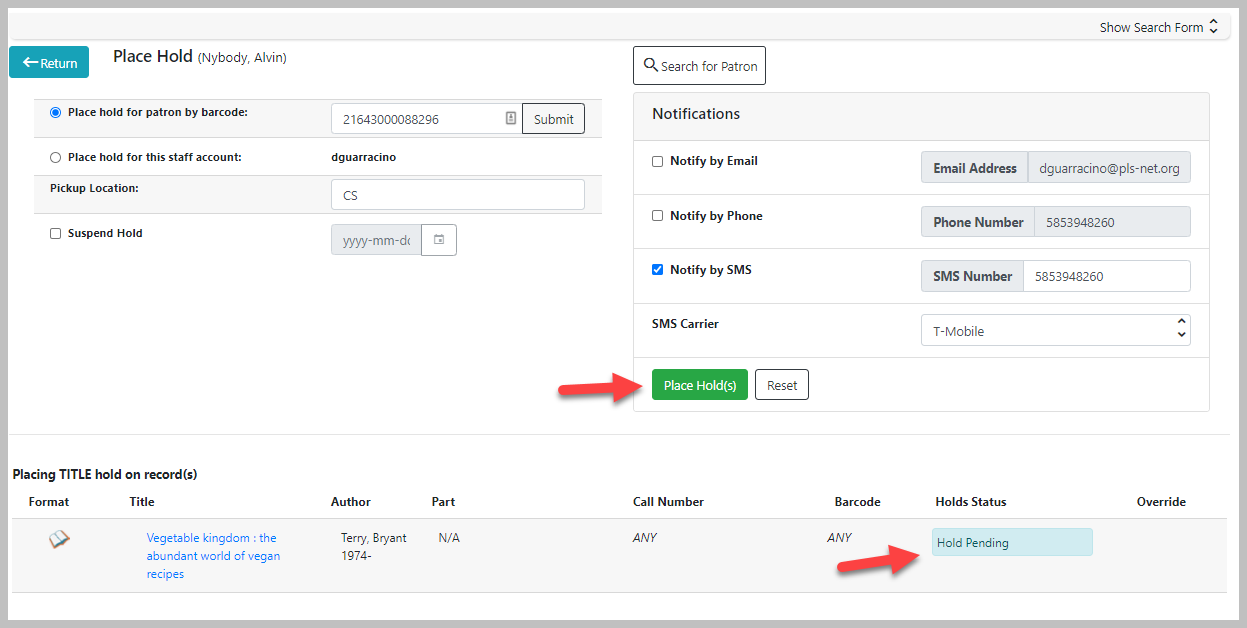
From the Catalog
- From an item in a catalog search results list, or the title details, click Place Hold
- In the Place Hold form, scan the patron barcode, or type it in and press Submit, or click Search for Patron
- In the search pop-up, enter the patron's name or other search criteria
- Select the patron from the search results
- Click Select
- Check to make sure the patron's hold notification preferences are correct
- Click the green Place Hold(s) button in the notifications section
- Verify that the Holds Status has changed from the blue Hold Pending to the green Hold Succeeded
- Continue to search/place more holds, or click out of the holds function
Traditional Staff Catalog
From Patron Account
- Retrieve the patron account
- Click Holds
- Click Place Holds
- Search for titles
- For selected title click Place Hold
- Check to make sure the patron's hold notification preferences are checked
- There have been some issues with the web client where notification preferences do not appear in the patron's user settings so remain unchecked in the place hold form
- Click Submit
- There is a current issue where the web client "remembers" where the cursor is positioned in the place hold screen and is in the same place on the hold confirmation screen - halfway down the screen. You will need to scroll up to view the confirmation message and see other navigation options.
- Continue to search/place more holds, or click out of the holds function
From the Catalog
- From an item in a catalog search results list, or the title details, click Place Hold
- In the Place Hold form, scan the patron barcode, or click Patron search to retrieve the patron by name
- In the search pop-up, enter the patron's name or other search criteria
- Select the patron from the search results
- Click Select
- Make sure the patron's name and hold notifications display
- Click Submit
Edit Holds
Pickup Library
Pickup library can be changed while the hold is in any status, including Readt for Pickup. If the hold is Waiting for Copy or Waiting for Capture, changing the pickup library will be seamless. If the hold is In Transit, the item will arrive at its original pickup destination and on check in it will be routed to the new destination. If the item is Ready for Pickup on a hold shelf, the status will change to "wrong shelf" and there is no other alert to the original pickup library. The item will need to be scanned in check in to put it in transit to the new library. If a library changes the pickup up location for a ready for pickup hold, they should contact the original library. Patrons can also change the location, but do not know to contact the library.- Select the hold(s) to edit
- Click Actions
- Select Edit Pickup Library
- In the pop-up box, select the desired new pickup library
- Click Submit
- Verify the updated pickup library in the open holds list

Notification Settings
Any changes to notification methods and numbers for exisiting holds must be made manually. Updating a patron's general contact information will not alter hold records.- Select the hold(s) to edit
- Click Actions
- Click Edit Notification settings
- In the pop-up select the notification type AND add the value
- Email draws from the email address on file
- Phone # should be enteretd in the format 555-123-4567
- Text/SMS # should be entered in the format 5559876543
- Click Submit
- Verify the updated notifications in the open holds list

Edit Hold dates
This function allows staff, depending on permissions, to edit varous dates related to the hold request. The most useful date that can be changed by all staff is Shelf Expire Date. The default shelf expire date is 7 days; if the hold is not pickedup in 7 days, the hold should be cleared from the shelf and routed on. Changing this date will alert all staff that the patron has been allowed extra (or less) time to pick up their hold.
Types of holds
There are four types of holds that can be placed in Evergreen.- Metaholds - are placed on Grouped Formats and Editions and can be filled by any copy from any of the grouped title records - for example, if a patron would accept the first available of a print book, large print book, or audiobook, a metahold can be placed on those grouped title records. Can be placed by patrons and by staff. Designated by an M.
- Title holds - are placed on a single title record and can be filled by any copy attached to that record. Can be placed by patrons and staff. Designbated by a T.
- Volume holds - are placed on volume, or call number, records for a specific library's holdings, and can only be filled by copies attched to the volume record. Can be placed by staff. Designated by a V.
- Copy holds - are placed on specific copy records and can only be filled by that specific copy. Can be placed by staff. Designated by a C.
Retarget holds
Holds need to be retargeted whenever a new item is added to a record, or after some types of item status changes, for instance when an item is changed from On Order to In Process. The system does not automatically recognize the newly added items as available to fill holds.- View the holds for the item.
- Highlight all the holds for the record, which have a status of Waiting for Copy. If there are a lot of holds, it may be helpful to sort the holds by Status.
- Click on the head of the status column.
- Under Actions, select Find Another Target.
- A window will open asking if you are sure you would like to reset the holds for these items.
- Click Yes. Nothing may appear to happen, or if you are retargeting a lot of holds at once, your screen may go blank or seem to freeze for a moment while the holds are retargeted.
- When the screen refreshes, the holds will be retargeted. The system will now recognize the new items as available for holds.
Target newly added copies for holds
Hold Limits
All patrons are allowed to place up to 20 active holds at one time. Patrons may also have up to 30 additional suspended holds.Transfer holds
Holds on one title can be transferred to another with the hold request time preserved. To do so,- Access the title record that you would like to transfer the holds TO.
- Select Mark for: → Title Hold Transfer from the title record
- Go to the hold that you would like to transfer to the new title.
- Select Actions → Transfer to Marked Title.
Hold Groups
Hold Groups Interface
The new Hold Groups interface is found under Circulation → Hold Groups. The interface is divided into four tabs:- Hold Groups - The Hold Groups tab provides an overview of all Hold Groups created by the logged in user. New Hold Groups can be created from this tab.
- Current Users - The Current Users tab is used to view the list of users on the open Hold Group. Hold Groups can also be created, edited, and deleted from this tab. Access to shared Hold Groups can be found on this tab as well.
- Add Users - The Add Users tab is used to identify patrons to add to the open Hold Group.
- Hold Events - The Hold Events tab displays a list of holds placed for users in the open Hold Group. Holds can be initiated and canceled from this tab as well.
Create a New Hold Group
- Go to Circulation → Hold Groups.
- On the Hold Group tab, click New Hold Group.
- Enter a name for the Hold Group.
- Enter a description for the Hold Group (optional).
- Choose the owning library from the drop-down (defaults to the workstation library).
- The Visible to Patrons? checkbox is currently not implemented.
- Click Create Bucket.
Add Users to a Hold Group
Patrons can be added to a Hold Group by barcode, by searching for a patron with an integrated patron search on the Add Users tab, or by a normal patron search.Add Users By Barcode
- Go to Circulation → Hold Groups.
- Double-click the name of the Hold Group you wish to add patrons to.
- Go to the Add Users tab.
- Scan or enter the patron barcode into the Scan Barcode field.
- Added patrons appear in a list under the Add All To Hold Group button. Users in this list are considered pending and have not yet been added to the Hold Group. Note that the parenthetical number for Add Users increases to display the number of pending users.
- Continue adding barcodes as needed.
- From the list, select one or more users with the checkboxes at the beginning of each row or select all users with the checkbox at the list.
- Use the Actions button (or right click any user line) and choose Add to Hold Group. The users will now appear on the Current Users tab as part of the Hold Group.
Add Users With Integrated Patron Search
- Go to Circulation → Hold Groups.
- Double-click the name of the Hold Group you wish to add patrons to.
- Go to the Add Users tab.
- Click Search for Patron. A patron search pop-up opens. The search is scoped to the workstation of the logged in staff member, but can be expanded by using the additional search fields.
- Enter search criteria into the appropriate fields. The pop-up defaults to the basic patron search. Additional search fields are available by clicking the down-arrow button to the right of the Search button. This option is sticky.
- Click Search or hit the Enter key. Results appear in the bottom portion of the pop-up window.
- Click anywhere on a row in the results list to select that patron.
- Click Select. The patron is added to the list of pending users. Users on this list have not yet been added to the Hold Group. Note that the parenthetical number for Add Users increases to display the number of pending users.
- Continue adding patrons as needed.
- From the list, select one or more users with the checkboxes at the beginning of each row or select all users with the checkbox at the list.
- Use the Actions button (or right click any user line) and choose Add to Hold Group. The users will now appear on the Current Users tab as part of the Hold Group.
- You can add some or all of the users in the pending users list to different Hold Groups without entering barcodes or searching again. Simply go to the Hold Groups tab and double-click another Hold Group from the list. Return to the Add Users tab and select the users you wish to add to the new Hold Group, and use the Actions menu to add them to the Hold Group.
Add Users From Patron Search
- Go to Search → Search for Patrons.
- Enter your search criteria.
- Use the checkboxes on each patron search result to select one or more patrons.
- Click Add to Bucket.
- A list of Hold Groups, as well as other patron buckets, are visible. (Only those Hold Groups created by the logged in user are visible.) Choose the Hold Group to which you want to add the patron(s) or create a new Hold Group.
- A message displays on the bottom right corner of the screen to confirm whether the patrons were added successfully to the Hold Group.
Edit An Existing Hold Group
- Go to Circulation → Hold Groups.
- On the Hold Groups tab, double-click the Hold Group you wish to modify. This will open the Hold Group in the Current Users tab.
- Click the Hold Groups button and choose Edit Hold Group.
- The Edit Bucket pop-up will open. You can edit the name, description, owning library, or visibility.
Place Holds For a Hold Group
Holds can be placed from the Hold Groups interface. Holds can be cancelled from the Hold Events tab by selecting the hold and using the Actions menu and choosing Cancel Hold Group Event.From the Hold Groups Interface
- Go to Circulation → Hold Groups.
- From the Hold Groups tab, double-click a Hold Group. The Hold Group will open in the Current Users tab.
- Go to the Hold Events tab.
- Click on New Hold Group Event.
- Enter the Record ID number for the bibliographic record on which you wish to place the hold.
- Use the checkbox to override all hold-blocking conditions possible if desired.
- Click Create Event.
- Please note that most additional hold options (e.g., choosing the pickup library or notification preferences) are disabled for holds placed by Hold Group. Pickup location and notification preferences adhere to the defaults for the respective patrons. Patrons can edit their notification preferences and pickup locations from My Account on the public catalog after the hold is placed. Holds may be suspended and an activate date added if desired.
Deleting a Hold Group
Hold Groups can be deleted on the Current Users tab. Deleting a Hold Group does not cancel any holds placed through the Hold Group.- Go to Circulation → Hold Groups.
- From the Hold Group tab, double-click the Hold Group you wish to delete. This will open the Hold Group in the Current Users tab.
- Click the Hold Groups dropdown and choose Delete Hold Group.
Ideas, requests, problems regarding OWWL Docs? Send feedback