Circulation: Check In
Overview
Scan an item in Check In to clear a circulation from a patron's account or to process an item status update.Basic Check In
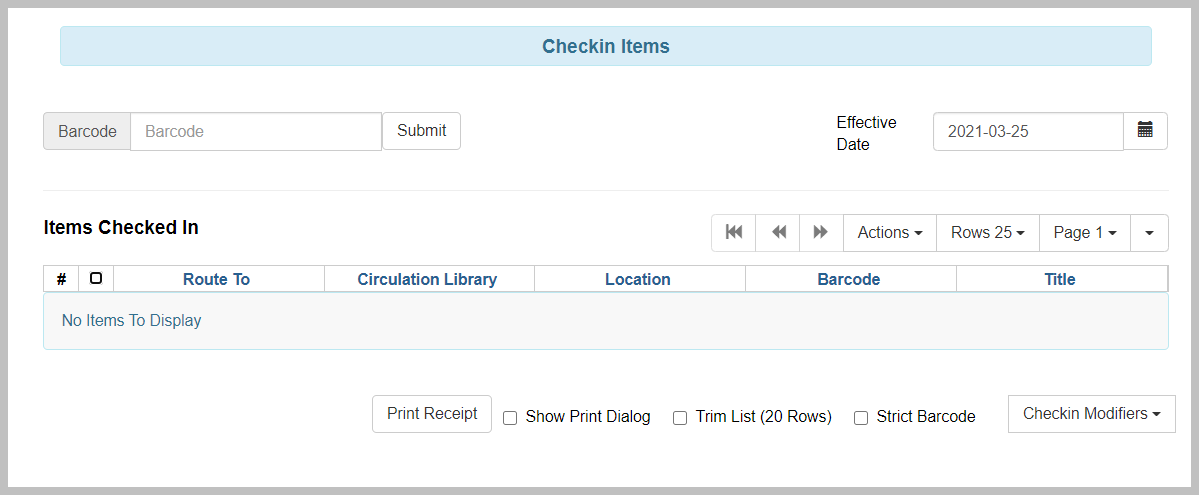
Check in page
- To check in an item, click Check In Items on the home screen. Or, select Check In from the Circulation menu in the toolbar.
- Scan in the item barcode (or enter the barcode manually and click Submit).
- The item will appear in the Items Checked In table.
If there is an overdue fine associated with the checkin, an alert will appear at the top of the screen with a fine tally for the current checkin session. To immediately handle fine payment, click the alert to jump to the patron’s bill record.
If the item being checked in can fill a hold, a pop-up box will appear with the patron's contact information (for a hold at your library) or with routing information (if being put in transit for a hold at another library). For more on processing holds, see below.
If the item being checked in is owned by another library, a pop-up box will appear with routing information. For more on processing items being sent to another library, see below.
Backdated Check In
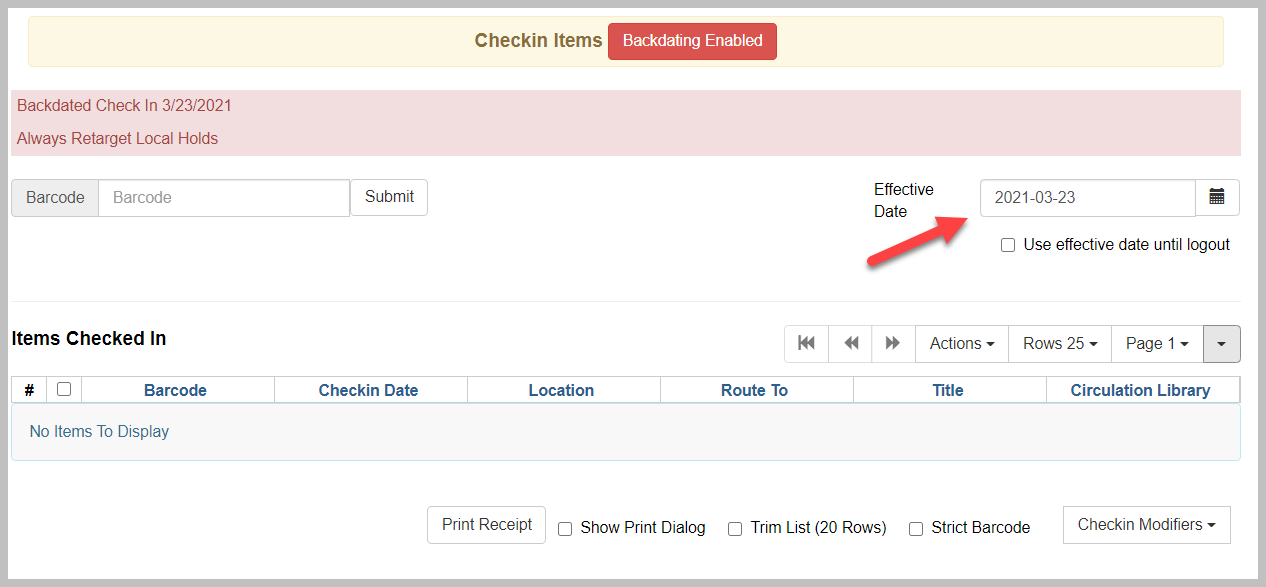
Check in page with backdating enabled
- Manually type the effective date or use the calendar gadget.
- Once the date is changed, a Backdated Check In [m/dd/yyyy] statement will be added at the top of the screen. A Backdating Enabled button will also appear at the top of the screen.
- To clear the backdate, refresh the Check In screen or close the tab.
Backdating Post-Checkin
If items have already been scanned using the current date, but should have been backdated, the effective date can be retroactively changed.- Select the item(s) from the Items Checked In table
- Select Backdate Post-Checkin from the Actions menu
- In the Backdate Already Checked-In circulations dialog, set the effective date. Manually type the correct date or use the calendar gadget.
- Click Submit
Special Check In Circumstances
Item Is Captured for a Hold
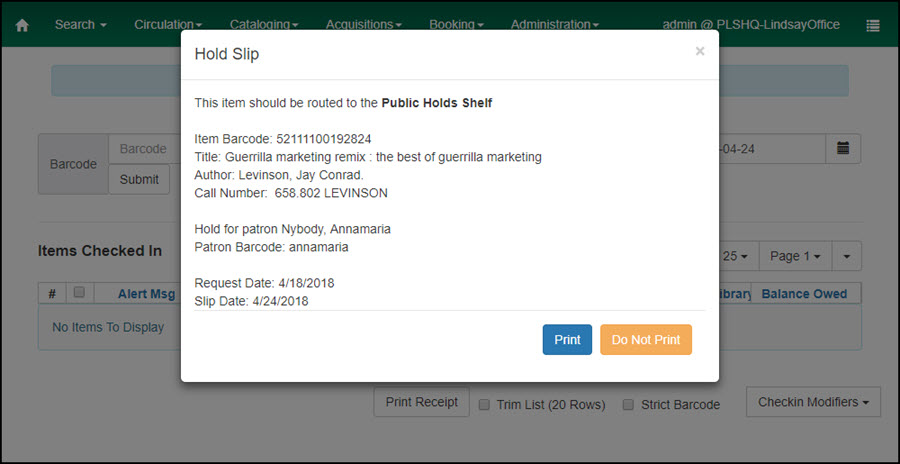
Hold Slip Pop-up
Transit Slip Pop-up
Be sure to address the hold or transit slip - either print or close the pop-up - before scanning a new item. If the pop-up is not closed before a new item is scanned, the auto-enter function of the scanner will trigger the slip to print instead of entering the barcode scanned.
If your library always prints hold and transit slips, you can use the Auto-Print Hold and Transit Slip Checkin Modifier.
If an item is not in a condition to be put in transit (for example, it's returned damaged), you may want not want to send it to another library. To cancel the transit, select the item's row in the Items Checked In table, and select Cancel Transit from the Actions menu. The item will then have a status of Canceled Transit rather than In Transit.
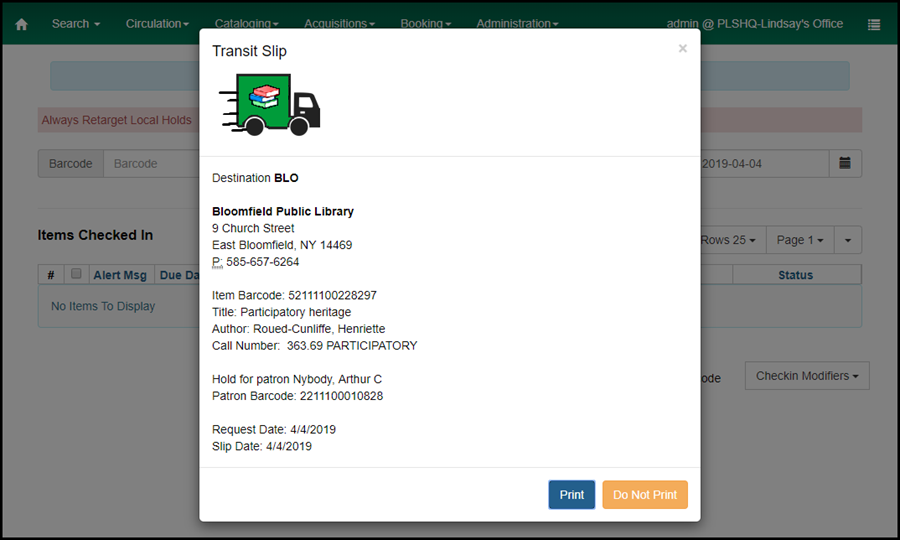
Item is put in transit
When an item is to be routed to its owning library, a Transit Slip pop-up will open. The alert includes the destination library and item information. Click Print to trigger the print version of the Hold Transit Slip.Be sure to address the transit slip - either print or close the pop-up - before scanning a new item. If the pop-up is not closed before a new item is scanned, the auto-enter function of the scanner will trigger the slip to print instead of entering the barcode scanned.
If your library always prints hold and transit slips, you can use the Auto-Print Hold and Transit Slip Checkin Modifier.
If an item is not in a condition to be put in transit (for example, it's returned damaged), you may want not want to send it to another library. To cancel the transit, select the item's row in the Items Checked In table, and select Cancel Transit from the Actions menu. The item will then have a status of Canceled Transit rather than In Transit.
Checkin Modifiers
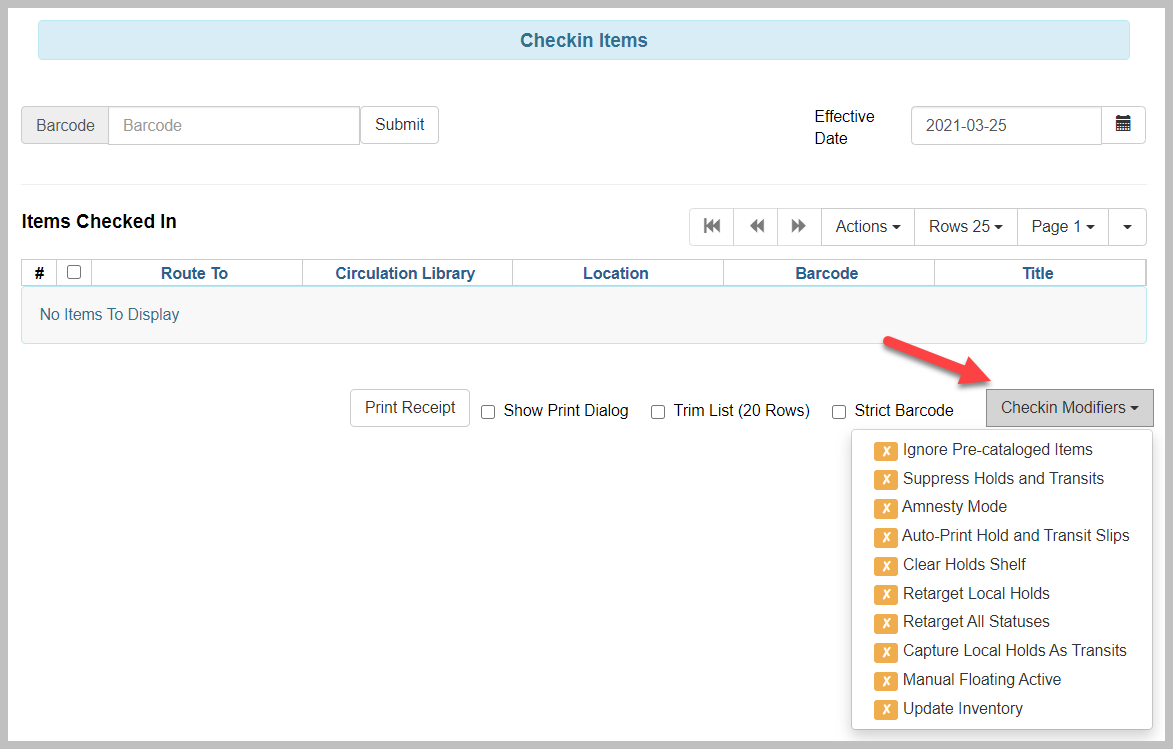
Checkin Modifiers
Ignore Pre-cataloged Items
No prompt ("This item needs to be routed to cataloging") when checking in a pre-cataloged item. Item status changes to Cataloging silently.PLS does not recommend using this Checkin Modifier. We recommend that you be alerted to and process pre-cataloged items right away.
Suppress Holds and Transits
Item will not be used to fill holds or be sent in transit, and instead will immediately have the Reshelving status.PLS does not recommend using this Checkin Modifier. Using this checking modifier will cause all any items checked in to fail to be sent in transit, including other libraries' items.
Amnesty Mode
Overdue fines will be voided if already created or not be added at all if not yet created for the circulation transaction. Per OWWL Policy , Amnesty Mode should not be used in place of going fine-free and should not be used unless in extenuating circumstances.Auto-Print Hold and Transit Slips
Hold Slips and Transit Slips will automatically be printed without the normal pop-up. Items are made available for hold or put in transit if applicable.Clear Holds Shelf
Checking in hold-shelf-expired items will clear the items from the hold shelf (holds to be cancelled) after they have expired (generally after seven days). This will cancel the hold, clear the item from the Holds Shelf list, and put the item into Reshelving, in transit to its owning library, or will fulfill the next hold in the queue.Retarget Local Holds
When checking in in process items that are owned by the library, attempt to find a local hold to retarget. This is intended to help with proper targeting of newly-catalogued items.Retarget All Statuses
Similar to Retarget Local Holds, this modifier will attempt to find a local hold to retarget, regardless of the status of the item being checked in. This modifier must be used in conjunction with the Retarget Local Holds modifier.PLS recommends that you set the Retarget Local Holds and Retarget All Statuses Checkin Modifiers. This is particularly important for holdings staff.
Capture Local Holds as Transit
Any local holds will be given an in transit status instead of on holds shelf. The intent is to stop the system from sending holds notifications before the item is ready to be placed on the holds shelf and item will have a status of in-transit until checked in again.Manual Floating Active
Floating Groups (in which items do not have set circulation libraries, but are shelved wherever they are checked in) must be configured for this modifier to function. The manual flag in Floating Groups dictates whether or not the "Manual Floating Active" checkin modifier needs to be active for a copy to float. This allows for greater control over when items float.PLS does not recommend using this Checkin Modifier. Floating groups are not used by any member libraries.
Update Inventory
When an item is scanned, the workstation and date/time will be recorded in the item's Inventory Workstation and Inventory Date fields.PLS recommends using this Checkin Modifier only when undertaking an inventory project.
Print Check In Receipt

Example check in receipt:

Check In Alerts and Failures
Mis-scan Alert

Copy Alert
Copy Status Lost
When a lost item bill has not been paid, or has been partially paid, the copy status remains Lost. If a Lost item is returned, force the action the return the item to circulation. A refund will not be applied to the patron's account.Copy Status Lost and Paid
When a lost item bill has been paid in full, the copy status changes to Lost and paid and the circulation transaction has been cleared from the patron account. If a Lost and Paid item is returned, library staff cannot check it in. They must route it to holdings maintenance staff who can manually edit the item record and change the Lost and Paid copy status to Available.Copy Status Missing
The alert states "checkout" exception, even when the item is scanned in check in.
Ideas, requests, problems regarding OWWL Docs? Send feedback